Working With Sub Tasks
The Connector supports the import and creation of JIRA sub-tasks through Microsoft Project. In Microsoft Project, a sub-task is a task that is indented under its parent.
NOTE: The indention level in Microsoft Project is not a requirement for a JIRA sub-task. You can have an indented task in Microsoft Project that is not a sub-task and you can have a JIRA sub-task in Microsoft Project that is not indented. This is entirely dependent on your requirements and how you are using The Connector.
Before going through creating a sub-task in Microsoft Project, let’s go through what needs to be setup in The Connector.
- On the JIRA Profile screen the Use Extended Web Services option must be turned on.
- In the Configure The Connector screen on the Default Mappings tab you must check the option Parent Issue ID and specify a Text field to map this to.
- On the Send to JIRA Customize screen check these options.
- Create new tasks in JIRA that are currently unlinked.
- Auto resolve parent/child issues based on indentation.
- Need to have the default values filled in on the Defaults Tab of the Send to JIRA Customize screen.
We first enter the Parent task in Microsoft Project (This can be done either by entering the information in-line or using the Issue Editor). Then select the Send to JIRA option, this will create an issue in JIRA. After the process is completed, you will see the issue ID in the Microsoft Project task.

Checking in JIRA, you will see the newly created issue. To create a sub-task for this Parent task you will enter the task in Microsoft Project right below. Then once entered click Task on the Project Ribbon and indent the task

Before we send this task to JIRA, we'll need to indicate to The Connector that this task is a sub-task. To do this, you will need to use the Issue Editor.
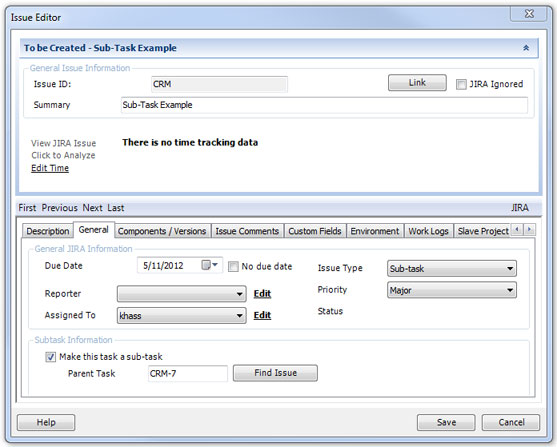
Once you have the Issue Editor open, select the General tab. On the bottom of the tab place a check in front of Make this task a sub-task to indicate that this will be a sub-task. You'll notice that The Connector will automatically fill in the Parent Issue ID. Using the Indent Level of the project sheet does this.
NOTE: It is possible to indicate a different parent task to The Connector, and when this task gets created in JIRA, it will be created under the specified parent.
Click the Save button to save what we have changed. Finally, use the Send to JIRA button to create the sub-task in JIRA. After this process, you will see the new issue ID of the created JIRA issue, the JIRA Issue Type will be Sub-task and the JIRA Parent Issue ID will equal the JIRA Issue ID of the parent task in the Microsoft Project plan.

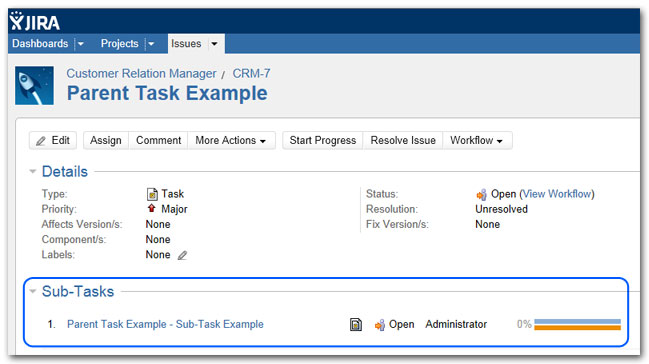
Check JIRA to see the newly created sub-task under the parent task.
Using Parent Tasks as Summary Tasks
The Connector also allows you to use Parent Tasks as a summary in Project. This is done by not assigning a resource to the parent tasks.
To set this up in The Connector go to the JIRA Profile and click on the Resources tab. Place a check in the option to Exclude resource assignment on parent tasks.
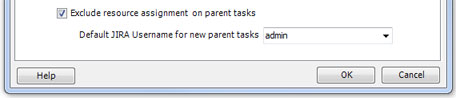
You will then need to specify a default JIRA Username. This is used if you create a Parent task in Microsoft Project and attempt to send it to JIRA, JIRA requires that all tasks have an assignee.
With this option turned on when importing or updating tasks from JIRA The Connector will not import a resource for any Parent Tasks and therefore Microsoft Project will not add time to your duration for the resource on the Parent Task.
Here is some additional information about working with sub-tasks:
Updating Sub Task Durations
Importing Sub Tasks