Sync All
The Sync All process allows you to synchronize tasks in your Microsoft Project plan with the issues that exist in JIRA. This process will do two steps, send information to JIRA from Microsoft Project and update Microsoft Project from JIRA. You must tell The Connector which system will be the master for the field. Some common examples are that Microsoft Project will be the master for the type and JIRA will be the master for any time spent. This means that when this process is run, the value of the issue type in Microsoft Project ALWAYS overwrites the value in JIRA and the time entered into JIRA will ALWAYS overwrite the values found in Microsoft Project. This is completely customizable based on individual requirements.
You can select to synchronize either selected tasks in Microsoft Project or choose to synchronize all the tasks in your project plan.
Note, any task marked with JIRAIGNORE as the issue ID will be excluded and skipped by this process.
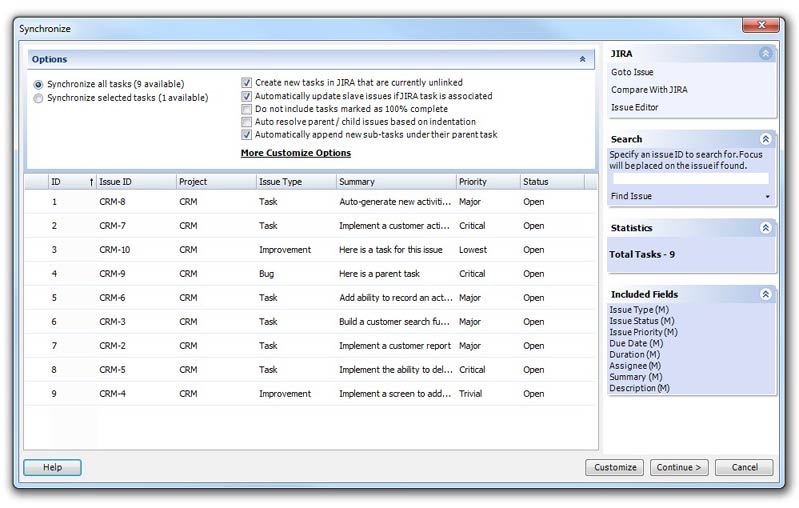
- Create new tasks in JIRA that are currently unlinked: This option will cause The Connector to create a new issue in JIRA if the issue ID field in MS Project is blank (unlinked).
- Automatically update slave issues if JIRA task is associated: If the Slave Issue configuration is enabled and the task has a Slave Issue ID set, the slave issue will be updated along with the primary issue.
- Do not include tasks marked as 100% complete: If Microsoft Project indicates that the task is 100% complete, it will be skipped during the processing of updating the issue in JIRA.
- Auto resolve parent / child issues based on indentation: The Connector will attempt to determine the parent / child relationship of new tasks that are about to be created based on the indentation levels that are currently defined in Microsoft Project. By default, The Connector does not require that issues and subtasks be organized in any specific way in Microsoft Project. You only need to have the parent issue ID correctly set.
- Automatically append new sub-tasks under their parent task: If this option is enabled, The Connector will add / append new sub-tasks that are found for a tasks that is being updated under its appropriate parent task. If this option is disabled, NO new issues will ever be added by this process. This allows you to control whether or not you want new tasks to be automatically added to your project plan.
- More Customize Options: Clicking this will bring you to the full Customize Options window.
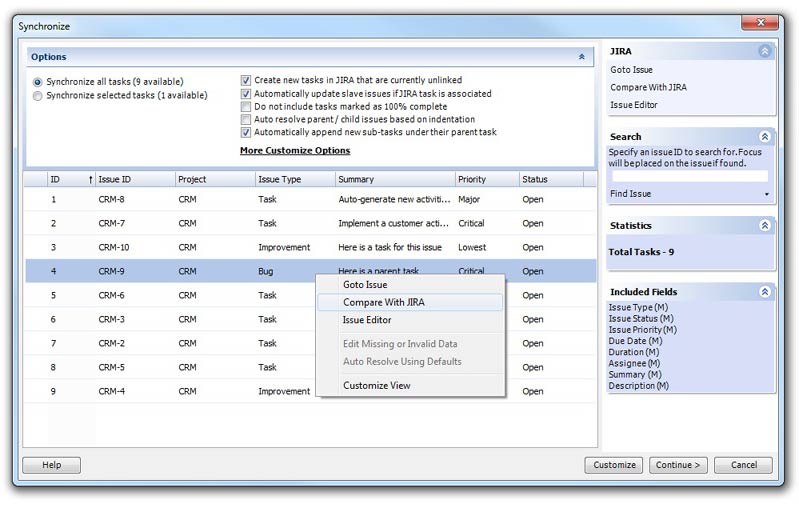
Right-Clicking on an issue will give you the menu shown above.
- Goto Issue: This will open the JIRA issue in a browser window.
- Compare With JIRA: This option will compare the values that are currently in Microsoft Project with the values that are currently in JIRA.
- Issue Editor: This will open the selected task in the issue editor so you can make any necessary changes to the issue before sending to JIRA.
- Customize View: Selecting this option will open a dialog where you can select the fields you wish to include in your view. You can select from any of the available standard fields and custom fields that are configured.
The Navigation Bar
The right side offers some information / navigational options.
- JIRA: The options here are the same that are described above when right clicking on an issue.
- Search: The search option allows you to specify an issue ID. Enter the value into the field and click the Find Issue. The Connector will select that issue in your list of issues on the left side of the screen.
- Statistics: The Statistics panel will show you some overall statistics on the issues you are about to update from JIRA. It will give you a total count and the number of new issues that will be created.
- Included Fields: This section gives you a quick glance at the fields you have selected for inclusion during the process. If the field is not selected and not included in this list, it will be ignored during any update process and the original values will be left intact.
When you are ready to begin the synchronization, click the Continue > button in the lower right corner. The Connector will begin synchronizing your selected tasks. You will be presented with a list of each of the issues as they are synchronized and any corresponding error messages.
Once the process has completed, you will see a summary of the total number of issues that have been sucessfully synchronized and failed along with the detail of the process below.
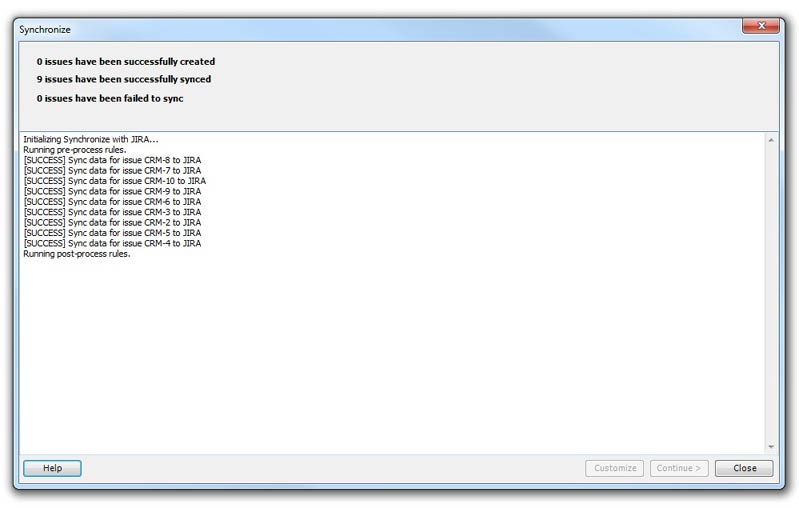
NOTE: If you have the "Stop on first failure" option enabed, this process will halt as soon as the first error occurs. If this option is not enabled, the error will be logged and the process will continue to the next task.