Data Exchange Rules
Data exchange rules allow you to configure different rules for linking issues in Microsoft Project and in JIRA.
To access this function click on Configure, select the JIRA profile and click Edit. Click on the Advanced tab and then click the Configure Data Exchange Rules button.
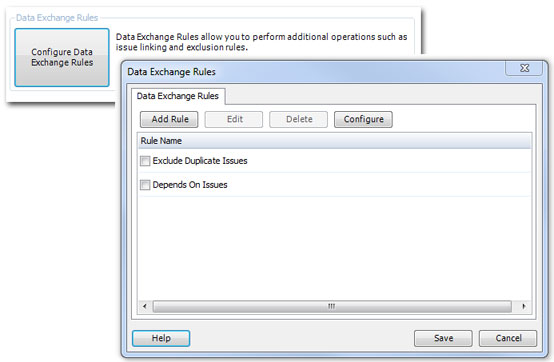
The Data Exchange Rules window will show you all of the rules you currently have configured. From this screen you can add a new rule, edit an existing rule, or delete an existing rule.
By toggling the check box next to the rule, you can enable/disable the active status of the rule. This will allow you to leave a rule configured, but temporarily disable it when needed.
Using the Configure button will allow you to import and export rules.

This is helpful for sharing configured rules with different users. Pressing the Export Rules button will give a you a Microsoft Windows Save As dialog box where you can specify a location to save the file. The rules are stored in an XML file that another user can import using the Import Rules option.
Creating a Rule
Click the Add Rule button on the dialog box to create a new Data Exchange Rule. This will open a window where you can specify the type of data exchange rule to use.
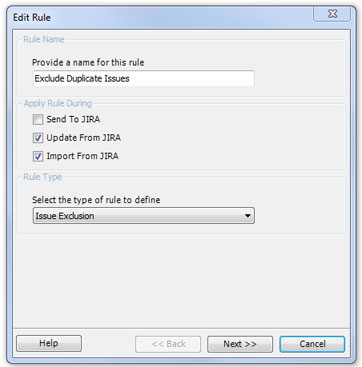
Provide a meaningful name for the rule that you wish in the Rule Name box.
You can specify during which actions you wish to have the rule executed. This allows you to create a rule that is only applied during the Send To JIRA function. Doing so would not run the rule when Update From JIRA is performed.
There are currently two types of rules from which to pick.
- Issue Linking -The issue linking rule allows you to map Microsoft Project predecessor or successor fields when a specific type of JIRA issue link is encountered.
- Example: You want your Microsoft Project plan to automatically create a dependency link if it detects that JIRA has an issue link of "depends on".
- Issue Exclusion - The issue exclusion rule allows you to exclude a type of issue if the specified link is encountered.
- Example: When performing planning, any issue that is a "duplicate" of another issue should not get scheduled since scheduling it would cause a doubling of effort. You can configure the rule to exclude any JIRA issues that are flagged as duplicates of another.
Issue Exclusion
Since we would only worry about excluding duplicates if we were bringing data from JIRA to Microsoft Project, we would only check the "Update From JIRA" and "Import From JIRA" options in the "Apply Rule During" area.
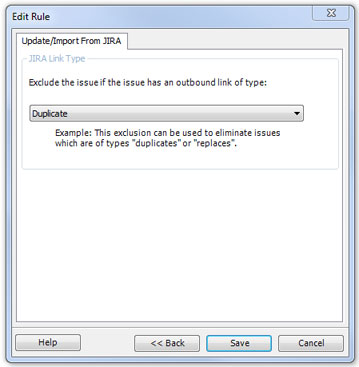
The Connector then queries JIRA for all available issue types and gives you a list of those types from which to choose. In this instance, we would choose the "Duplicate" type.
Issue Linking
Creating a Data Exchange Rule for a dependency allows you to specify how you want the dependency to link in Microsoft Project.
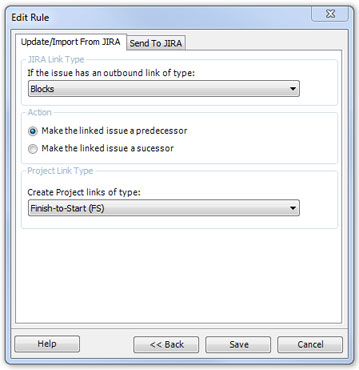
First configure what is needed for the Update / Import from JIRA.
- Specify the type of outbound link The Connector will look for from JIRA to apply this rule. The choices include Blocks, Cloners, Duplicate, and Relates.
- Select the action that The Connector will do when it finds one of these links.
- Make the linked issue a predecessor
- Make the linked issue a successor
- Select the Microsoft Project Link Type - The Connector supports the four types of linking in Microsoft Project.
- Finish-to-Start
- Start-to-Start
- Finish-to-Finish
- Start-to-Finish
Then click the Send to JIRA tab and specify what The Connector needs to do when sending to JIRA.
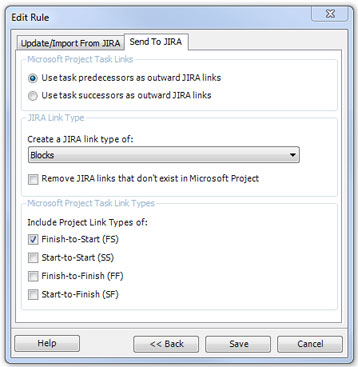
- Specify which of the linked tasks will be used as the outward JIRA link
- Use task predecessors as outward JIRA links
- Use task successors as outward JIRA links
- Specify the type of JIRA link to create. The choices include Blocks, Cloners, Duplicate, and Relates. (This will be the same as what was specified on the Update/Import tab.
- Remove JIRA links - this will remove any JIRA links that are not in Microsoft Project.
- Choose the Project link types to include
- Finish-to-Start
- Start-to-Start
- Finish-to-Finish
- Start-to-Finish
Click Save and the rule will be saved and active.